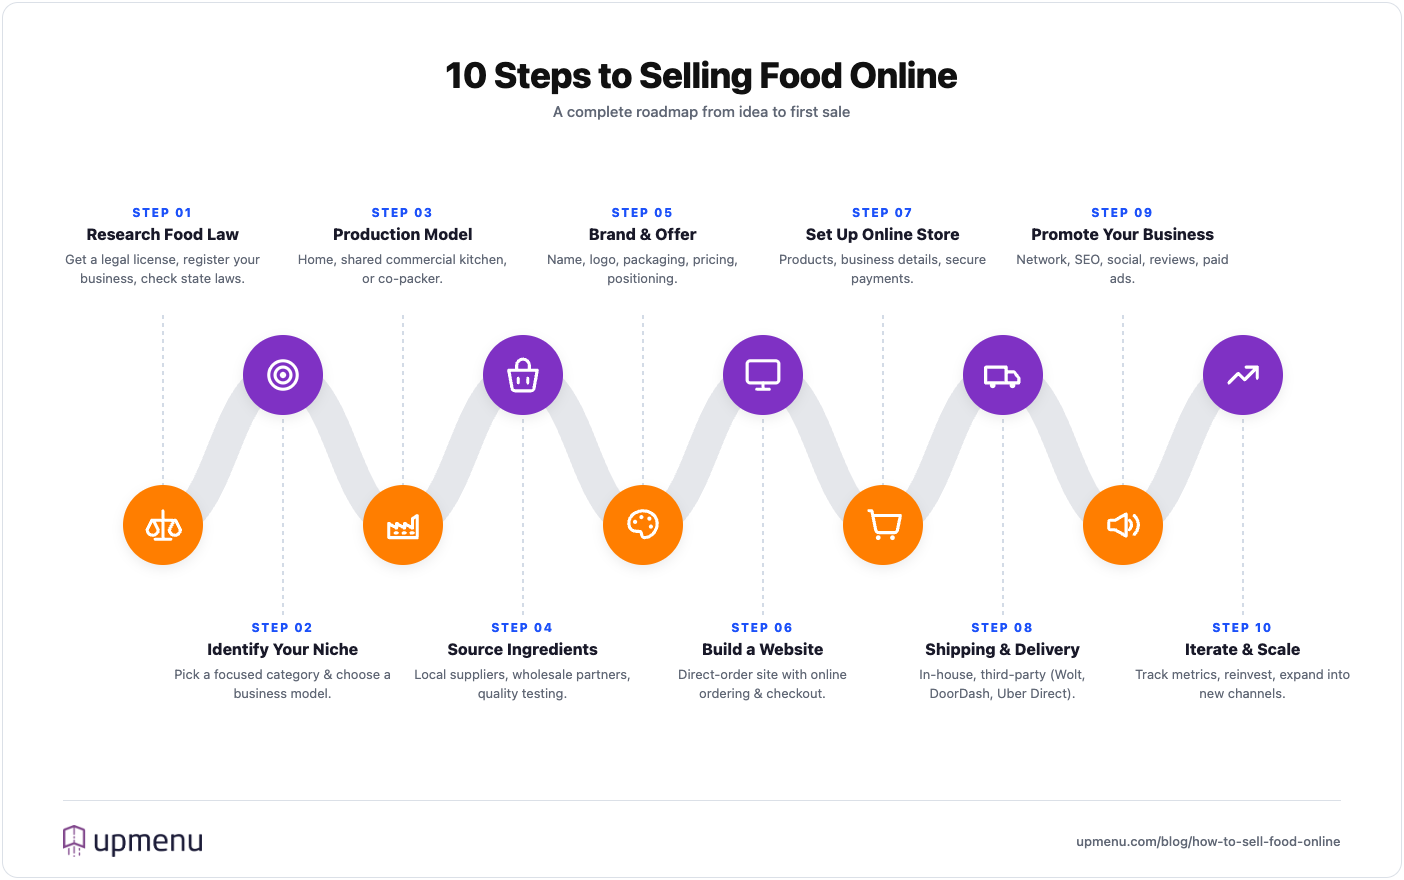
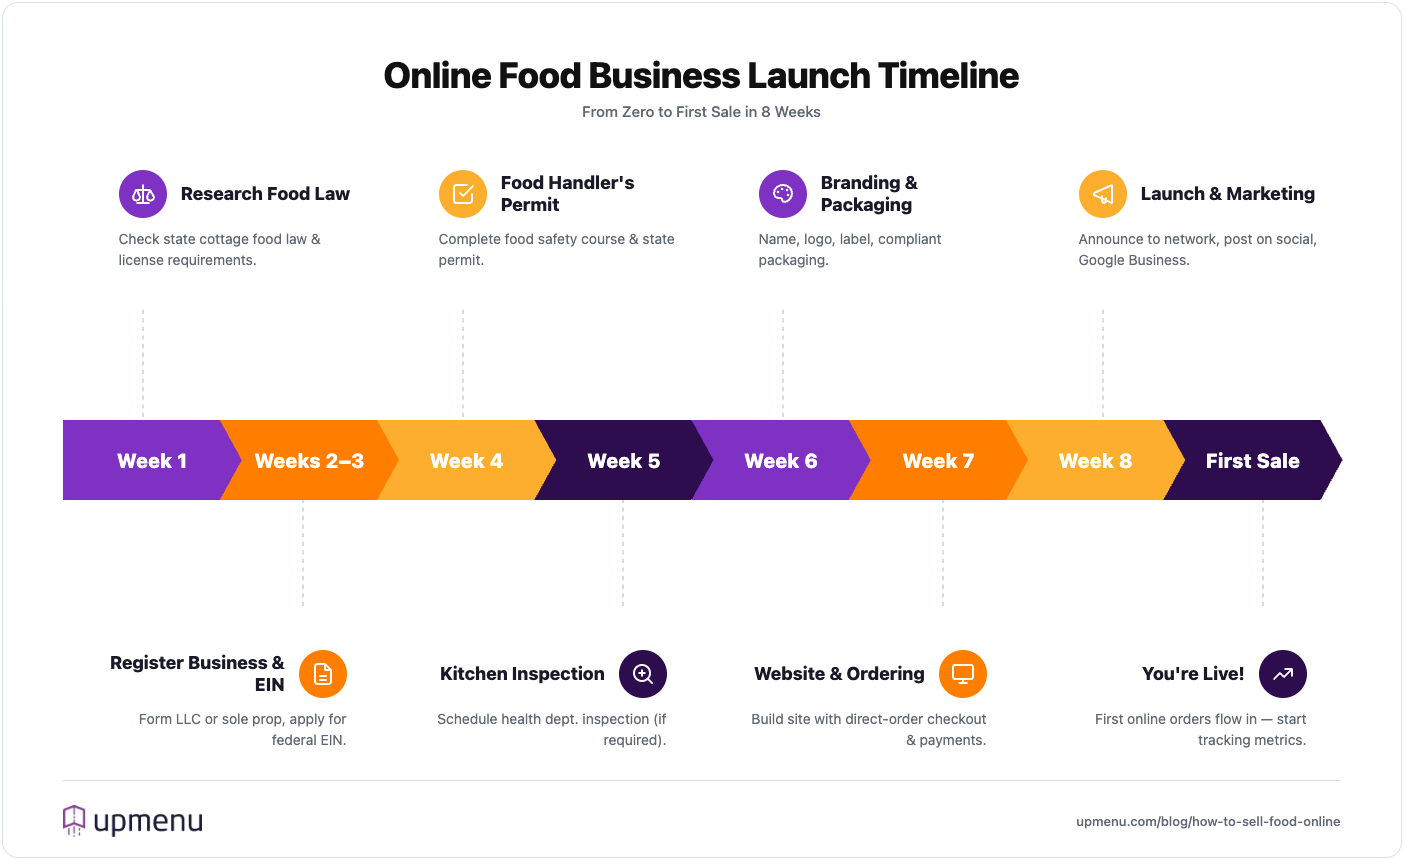
Step 1: Research Food Law and Get a Legal License
To legally sell food online in the US, you need three things: (1) a registered business (LLC, sole proprietorship, or corporation), (2) a food license or cottage food permit from your state, and (3) a sales channel compliant with FDA labeling rules. Federal regulators — the FDA — oversee labeling and interstate sales. State agencies handle licensing, inspections, and cottage food laws. Below is everything you need to know to comply.
What Are the Types of Food Laws?
There are various types of food laws, such as federal and state laws, each with its own specific focus and responsibilities.
2. Manufacturing
This model involves outsourcing the production of your food products to a third-party manufacturer.
This can be a good option for businesses that want to expand their product line or increase production, as it allows for greater efficiency and scalability.
However, it also means giving up some control over the production process and may require a larger investment upfront.
The great thing is that you don’t have to worry about food packaging or the food service supply chain overall. This model will take care of the process from preparing to shipping food and other goods.
3. Reselling
This model involves buying and reselling food products that are already produced by other companies.
This can be a good option for businesses that want to focus on sales and marketing, as it allows for lower production costs and less investment in equipment and facilities.
However, it also means less control over the quality and consistency of the products and may limit the uniqueness of your offering.
Step 4: Source Your Ingredients
You have three main sourcing options: grocery stores (convenient, expensive — best for testing), local suppliers (fresh, support local economy — moderate cost), and wholesale warehouses (lowest cost — best for scale).
Build long-term relationships with one or two suppliers to lock in pricing, get early access to seasonal ingredients, and reduce ordering friction.
For a detailed comparison, see our guide to restaurant food suppliers and supply chain management best practices.
Step 5: Build Your Brand and Offer
Your brand and offer make the buyer decide between you and a competitor — even when both make the same product. Five essentials, in order of importance:
- Brand name: Memorable, easy to spell, easy to pronounce. Check domain availability and trademark before committing. Need ideas? Use our free restaurant name generator.
- Logo: Simple, recognizable at small sizes (Instagram avatar test). Tools like Canva work fine to start.
- Brand colors: Strategic color use can boost brand recognition by up to 80%. Pick 2–3 colors that fit your niche and stay consistent.
- Packaging: Eye-catching, on-brand, and functional — must protect the product during shipping. The FDA regulates food-contact materials for safety.
- Pricing: Cost-plus, market-based, or value-based. For cottage food baked goods, aim for 50–70% gross margin. A batch of cookies costing $8 in ingredients should sell for $30–$40 per dozen — not $12. For deeper guidance, see restaurant menu pricing.
Add high-quality food photography to every product. Visuals sell food more than words. If hiring a photographer is out of budget, use natural light, a clean background, and shoot from a 45° angle — that combination beats most amateur photos.
For a complete brand build, see our guide to restaurant branding.
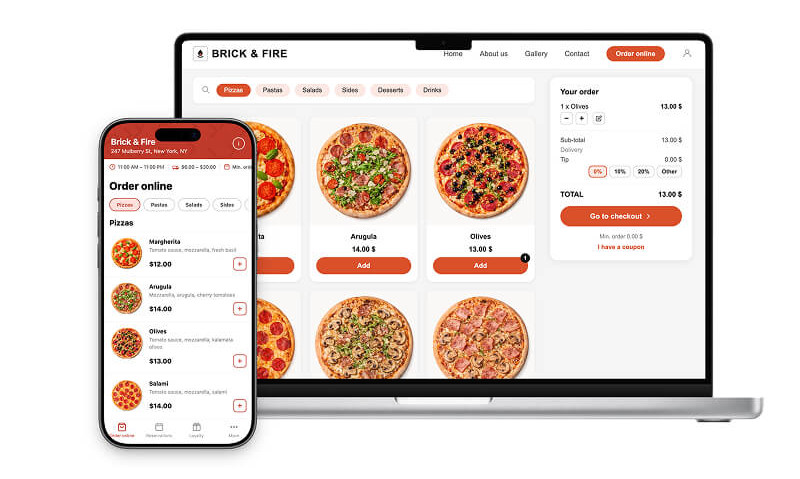
Step 6: Build a Website with Online Ordering
Three practical steps to launch your food website:
- Pick a template designed for food businesses — UpMenu’s restaurant website builder offers 40+ pre-designed templates by cuisine type.
- Customize your design to match your brand: logo, colors, food photography, About page. Keep navigation simple — fewer than 6 top-level menu items.
- Add online ordering as a primary CTA. Restaurants that put “Order Online” in the navigation see 30%+ more direct orders than those without.
For step-by-step setup, see how to create a restaurant website and how to set up an online ordering system.
Step 7: Set Up Your Online Store
Once you’ve built your website, the next step to start selling food is to create an online store and set it up to sell your products.
In the instructions below, I’ll show you how quick and easy it is with the UpMenu online ordering system.
1. Set Up Offer
To sell your products and reach customers, you have to add your products to make them available for purchase.
This includes adding product images, menu descriptions, and pricing information.
2. Provide Business Details
Providing business details in your online store is a necessary step in building trust with your customers.
Add your business name, address, phone number, and email address. It’s also important to include information about your business hours and any other relevant details.
3. Set Up Payment Methods
To enable customers to make purchases, you need to set up secure payment methods in your online store.
UpMenu supports the following online payment providers: Stripe (including Apple Pay and Google Pay), PayPal, and Adyen.
Step 8: Set Up Shipping and Delivery
Shipping and delivery are crucial for any food business. A well-planned strategy ensures timely orders for customers and efficient handling of your delivery needs.
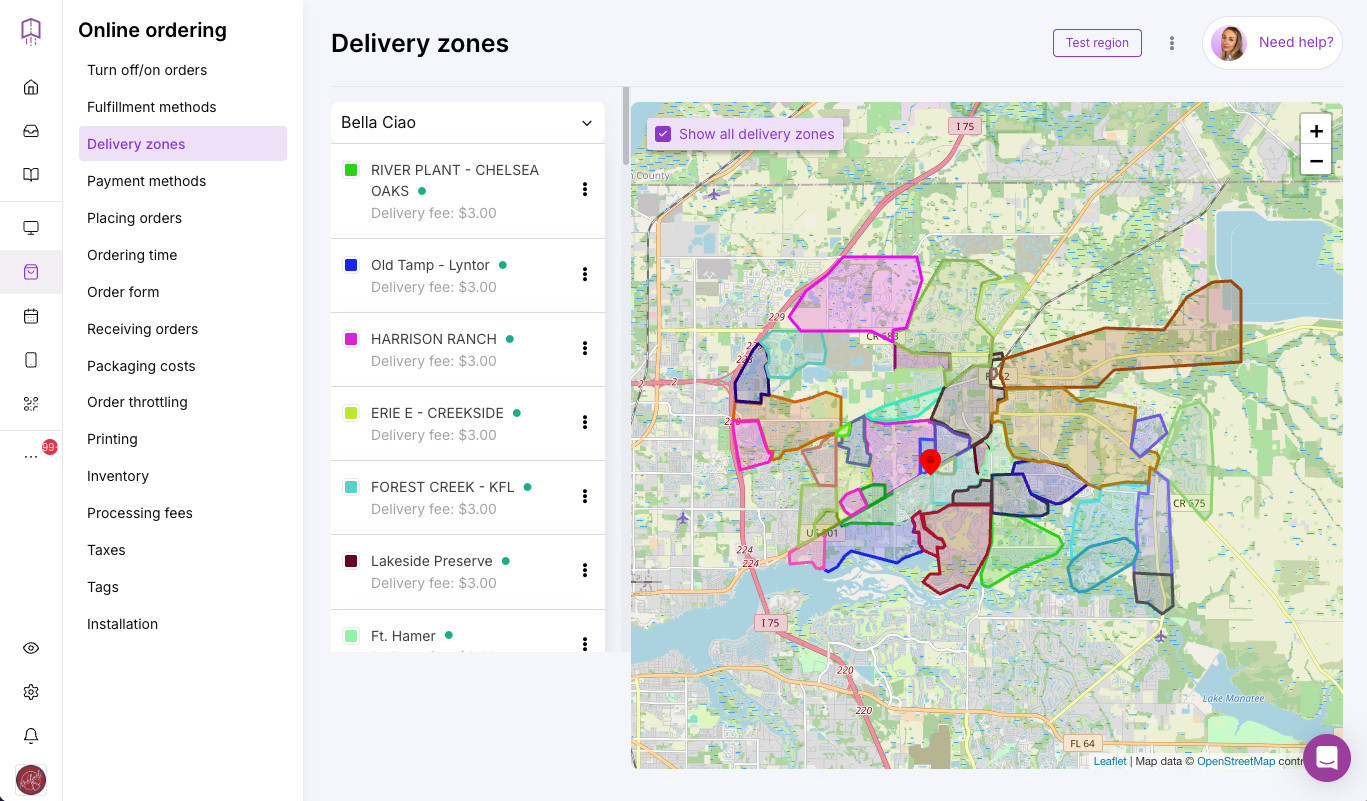
Create and Manage Delivery Zones
To ensure that your customers receive their orders in a timely manner, it’s necessary to set up clear delivery zones for your business.
This includes determining the areas you can realistically deliver to and the delivery fee associated with each delivery zone.
Pickup or Delivery: What to Offer
As a food business, you have to decide whether to offer pickup or delivery service, or both.
Pickup service can be more economical, but delivery service can provide more convenience for customers.
In-House Delivery vs. Third-Party Courier Service
Decide whether to manage delivery in-house or outsource it to a courier service.
Handling delivery yourself gives you more control over the process and helps build stronger customer relationships, but it can be time-consuming and costly. You’ll need your own drivers and delivery software to manage orders and routes efficiently.
Third-party delivery services can simplify logistics, but are often more expensive and less personal. With this model, you provide direct online ordering through your website or app, while partners like Wolt Drive, Stuart, Uber Direct, or DoorDash Drive handle delivery.
Include Packaging for Safe Transport
Use sturdy, leak-proof containers and insulated options for perishable items. Add tamper-evident seals to boost customer confidence.
Extra packaging for fragile or cold items can increase shipping costs, weight, and handling time, so factor this into your pricing. For refrigerated products, consider cold packs, temperature-controlled carriers, or limit shipping to local areas with same-day delivery to avoid spoilage.
Step 9: Promote Your Online Food Business
The marketing budget matters less than the channel order. For most new food sellers, start with the lowest-cost, highest-trust channels first:
1. Tell people you already know
Your first 10–20 customers are already in your life: friends, family, neighbors, coworkers, parents at your kids’ school, your church or community group. These people already know your food is good — they just need to know they can buy it and how to order. A single text or social post with your ordering link is often enough.
2. Optimize for Local SEO and Google Business Profile
Set up and verify a Google Business Profile for your operation (cottage food sellers can list as “service area business”). This puts you in Google Maps and local search results. Combine with restaurant-focused SEO best practices — see our restaurant SEO guide.
3. Social Media Marketing — Instagram-first for food
Food is a visual category. Post 3–5 photos per week of your product, packaging, and prep process. Use food-relevant hashtags (#homemade, #cottagefood, #yourcityfood). Drive followers to your ordering link in bio. See our restaurant Instagram marketing guide.
4. Reviews on Google and Yelp
Encourage every happy customer to leave a Google review. Respond to every review (positive and negative) within 48 hours. Reviews are the single biggest signal for local food discovery.
5. Email and SMS Marketing
Build a subscriber list from day one. Even 100 subscribers can generate consistent repeat orders if you send a weekly menu update or seasonal promotion.
6. Influencer and UGC Partnerships
Partner with local food influencers (1K–10K followers) for product trades or affiliate revenue. Authenticity beats reach for food. See restaurant influencer marketing.
7. Paid Ads (when ready to scale)
Once you have proof your product sells, Google Ads and Meta (Facebook/Instagram) ads can scale customer acquisition. Don’t start here — paid ads to an unproven product burn cash. For a full marketing strategy, see food business marketing strategies and our broader restaurant marketing strategies.
Step 10: Iterate and Scale
Once orders are coming in consistently, your job shifts from launching to optimizing. Three metrics tell you what to do next:
- Conversion rate (visitors → orders): Track how many people who land on your ordering page actually complete a purchase. A healthy food ordering site converts 3–8% of visitors. Below 2% usually means friction in checkout (too many steps, unclear delivery zones, missing payment methods) or unclear product photos. Above 8% means you can spend more on traffic.
- Average order value (AOV): Calculated as total revenue ÷ number of orders. Easiest levers to raise it: bundle deals (“buy 3, save 15%”), free-delivery threshold ($25+), suggested add-ons at checkout, and curated combos. A $5 AOV lift on 200 orders/month = $1,000 extra revenue with zero new customers.
- Customer lifetime value (LTV) and repeat rate: Track how many customers come back within 30, 60, and 90 days. Repeat customers cost nothing to acquire and typically spend 67% more per order than first-timers. Focus on: order confirmation emails, post-delivery follow-up, a simple loyalty program, and SMS for restock alerts. See our restaurant loyalty programs guide for specific tactics.
When to invest in scale
Reinvest in what’s already working before adding new channels. Specific scaling moves, in order of typical ROI:
- Branded mobile app: direct-order brands using a custom mobile app for restaurants see significantly higher repeat order rates than web-only. UpMenu customer Yami Sushi reached €107,684 in revenue largely through its branded app (read full case study).
- Expand product line: add 2–3 new SKUs based on what your top customers ask for. Validate with a pre-order before mass production.
- Geographic expansion: add new delivery zones, partner with local fulfillment, or ship interstate (note: interstate sales typically require FDA registration if not under cottage food).
- Move from cottage food to commercial kitchen: when you consistently hit 70%+ of your state’s cottage food revenue cap, start renting a shared commercial kitchen to unlock refrigerated products and remove the cap.
- Add a second channel: if you’re website-only, list on a marketplace for discovery. If you’re marketplace-only, build your own ordering site to capture margin.
The mistake to avoid: chasing every new opportunity simultaneously. Pick one scale move per quarter, measure its impact on conversion rate / AOV / repeat rate, and only move to the next once you’ve stabilized.